Black Heart Revenge Cake
Romance is dead and this vintage black heart shaped cake is bleeding love! Now we’ve got bad blood!
Equipment
- 1 Medium Bowl
- 1 Bench scraper
- 1 Cake lifter (Optional)
Ingredients
- 1 Boxed red velvet cake mix or your favorite red velvet cake recipe and associated ingredients We recommend Perfect Red Velvet Cake - Wilton
- 12-16 Maraschino cherries
- 1 ½ packages Decorator Preferred Black Fondant, 24 oz. Fondant Icing 36 oz. total
- 1 ½ containers Edible Fake Blood Glaze for Cakes and Cupcakes, 4 oz.
- 2 cups Creamy White Decorator Frosting, Vanilla Flavored, 4 lb.
- 1 container Black Gel Food Coloring, 1 oz.
- 1 container WILTON HALLOWEEN SPRINKLE MIX GORE TALL 4.3 OZ
Instructions
Bake Cakes
- Use your favorite red velvet cake recipe or boxed red velvet cake mix, following the instructions for two 9-inch cakes.
- Cool in pan on cooling rack 10 minutes; Remove from pans and cool completely on cooling rack before decorating.
Level Cakes
- Use a cake leveler (or serrated knife) to remove the domed, rounded top off the cake. If the cake’s dome did not rise above the pan level, use the natural edge of the baked sides of the cake as a guide.
Color Icing
- Put 2 cups (16 oz.) of the Creamy White Decorator Frosting in a medium bowl and combine Wilton Black Gel Food Coloring with the frosting until black.An alternative is to use 2 cups (16 oz.) of chocolate icing. Mix black gel food coloring into icing until desired color is reached.
Stack Cake Layers with Icing & Glaze
- On top edge of first cake layer, create a circle border with the black frosting using tip 4B to capture the Edible Fake Blood Glaze and keep from spilling out.
- Fill the inside of the frosting circle border with 1 container of Edible Fake Blood Glaze.
- Add the second cake layer on top of the base cake layer.
- Using the 4B tip, pipe icing around the gap between the cake layers and smooth out with angled icing spatula to create an even side surface for the fondant.
Fondant Preparation
- Roll out black fondant using a fondant rolling pin to more than an ⅛” but less than a ¼” thick. Consider the surface of the top, plus the height of the cake, while you roll out the fondant.
- Use a bench scraper, working from the outside edges towards the inside, carefully remove the fondant from the surface and roll it up loosely toward you. Use the rolling pin to help with transfer to the cake. Make sure that all of the edges are separated from the counter and loosened from the surface.
- Starting at the furthest point from you at the bottom edge of the cake, gently roll out the loosely rolled fondant onto the cake. Tip: fondant can dry, so save this step until ready to cover the cake.
- The fondant layer should completely cover the cake and extend out past the bottom edges. With warmed hands, gently smooth the fondant around the heart shape.
- Using your knife cut the fondant around the bottom of the cake ensuring it covers the bottom edges. Remove the extra fondant. You can also use a pizza cutter or small knife to trim away the excess fondant. Tip: If the fondant starts to dry before you can add the decoration, you can rub shortening on your hands and use it to smooth over any cracks.
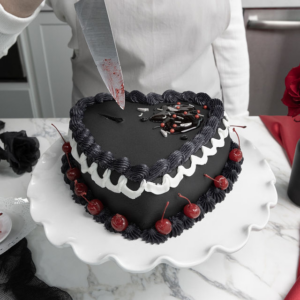
Pipe the Border
- Star Dollops: Add star dollops around the bottom of the heart with tip 4B making pull-up stars. Squeeze the piping bag until a quarter size dollop of icing is created. Then push the tip into the circle of frosting and pull out while squeezing the piping bag. Be sure to leave space between each star for cherries.
- Shell Icing Border: Pipe black frosting around the top border of the cake to create shell shapes using tip 4B. With a consistent pressure on the piping bag, pull the piping bag towards you for three inches. Then double back one inch. Repeat.
- Banner Swag Icing: Below the black icing border on the top of cake, use 8 oz. of white frosting and tip 103 to create scallop shapes around the cake. Beginning at the top border shell frosting, create a half circle and spacing every other shell piping continuously repeating around the whole cake.
Finishing Touches
- Top cake with Edible Fake Blood and Gore Halloween sprinkles.
- Add cherries in between each star at the bottom of the cake.
Video
Tried this recipe?Take a picture and tag us @WiltonCakes on Instagram